Getting Started with Lingora
Welcome to Lingora — Your Salesforce metadata, fluent in every language. This guide walks you through everything you need to know to go from a fresh account to publishing translated Salesforce metadata, step by step. Whether you're a solo admin managing a handful of custom labels or a translation team handling thousands of strings across multiple orgs, you'll be up and running in minutes.
1. What is Lingora?
Lingora is a SaaS platform purpose-built for Salesforce metadata translation. It sits between your Salesforce org and your translation workflow, handling the awkward file formats, token preservation, and review process that makes Salesforce localization painful.
What Lingora translates:
- Custom labels and field labels
- Picklist values and record types
- Flow and validation rule messages
- Page layout and component labels
- Any other translatable metadata exported from Salesforce Translation Workbench
- Knowledge Articles — translate __kav record fields (Title, Summary, rich text body) with a dedicated document workspace (Studio/Partner plans)
How it works at a high level:
- Export XLIFF or STF files from Salesforce Translation Workbench (or let Lingora retrieve them directly for connected orgs)
- Upload them into a Lingora project
- Translate strings using your chosen engine — AI-powered or API-based
- Review and approve candidates in the workspace UI
- Export translated files and import them back into Salesforce (or deploy directly for connected orgs)
Translation engines available:
| Engine | Type | Notes |
|---|---|---|
| Lingora LLM | AI (Anthropic) | Highest quality; understands Salesforce context; consumes credits |
| DeepL | Neural MT | Fast, high quality; BYOK (Bring Your Own Key) |
| Google Translate | Neural MT | Broad language coverage; BYOK |
| Lara | Neural MT | Specialized in technical content; BYOK |
BYOK engines use your own API keys and consume zero Lingora credits, giving you full control over cost and volume.
2. Creating Your Account
Sign Up
- Visit the Lingora landing page and click Get Started or Start Free — 50 Credits.
- Sign up with your email address or use SSO. Authentication is handled securely via Clerk — no passwords are stored on Lingora's servers.
- After your account is created, you'll land on the Onboarding page.
Onboarding
When you first sign in, the onboarding page gives you a quick overview of what's waiting for you:
- 50 free LLM credits — automatically granted to your account as a one-time welcome gift. These let you try the Lingora LLM engine before committing to a paid plan.
- Upgrade options — if you already know you need Pro, Studio, or Partner features, you can upgrade right from the onboarding page.
- Next steps — two quick-start actions: "Create your first project" and "Connect Salesforce" (Studio and Partner tiers).
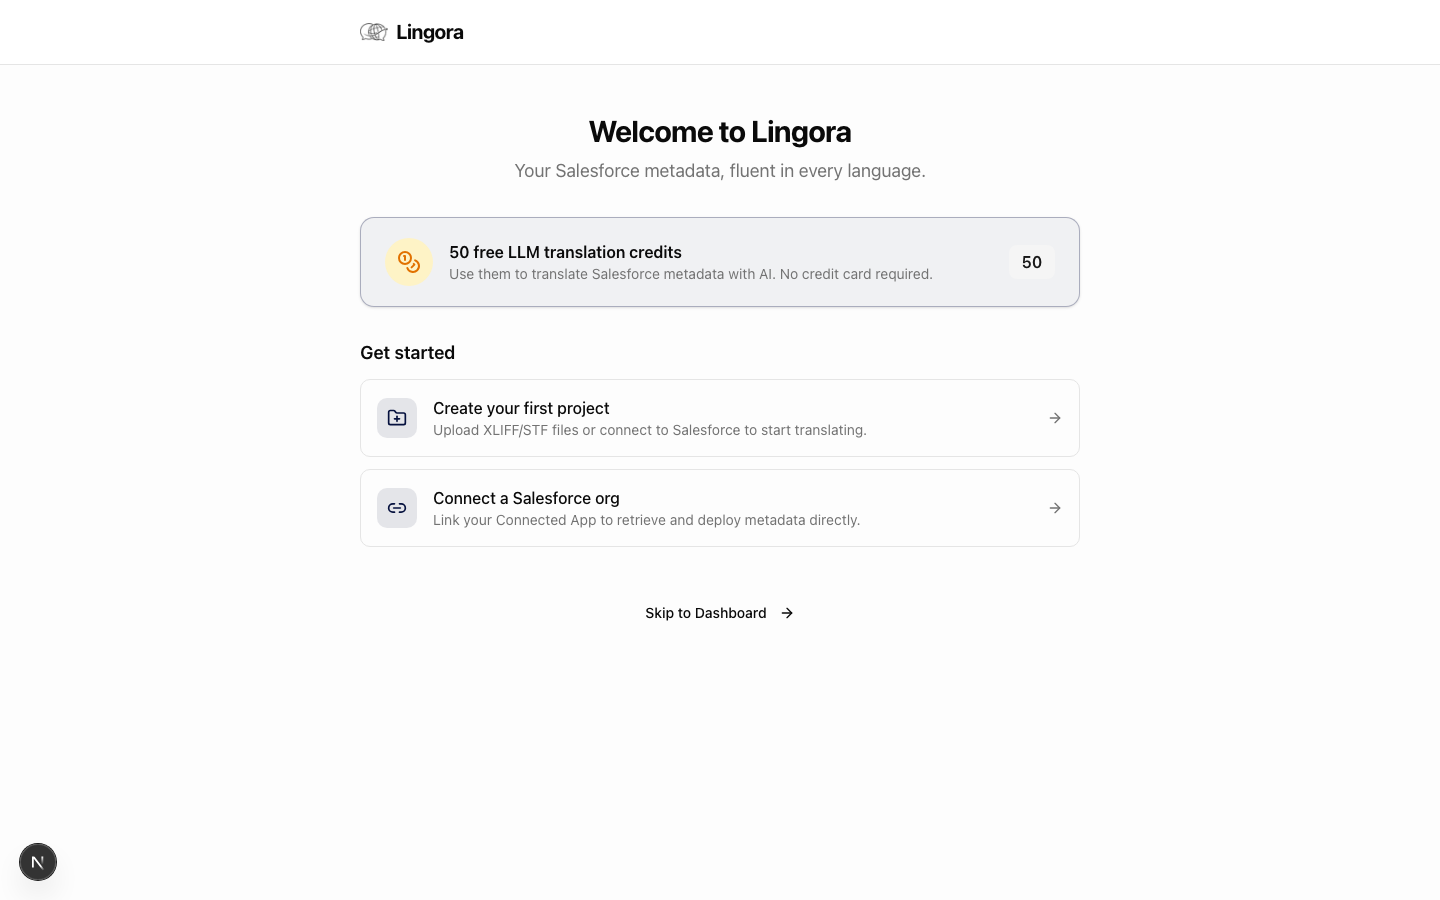
Note: Free-tier accounts are upload-based only. If you want Lingora to retrieve metadata directly from your Salesforce org, upgrade to Studio or Partner.
3. Platform Navigation
Once you're inside the platform, navigation is handled by a collapsible sidebar on the left and a persistent header at the top.
Sidebar
The sidebar is divided into two sections:
Workspace
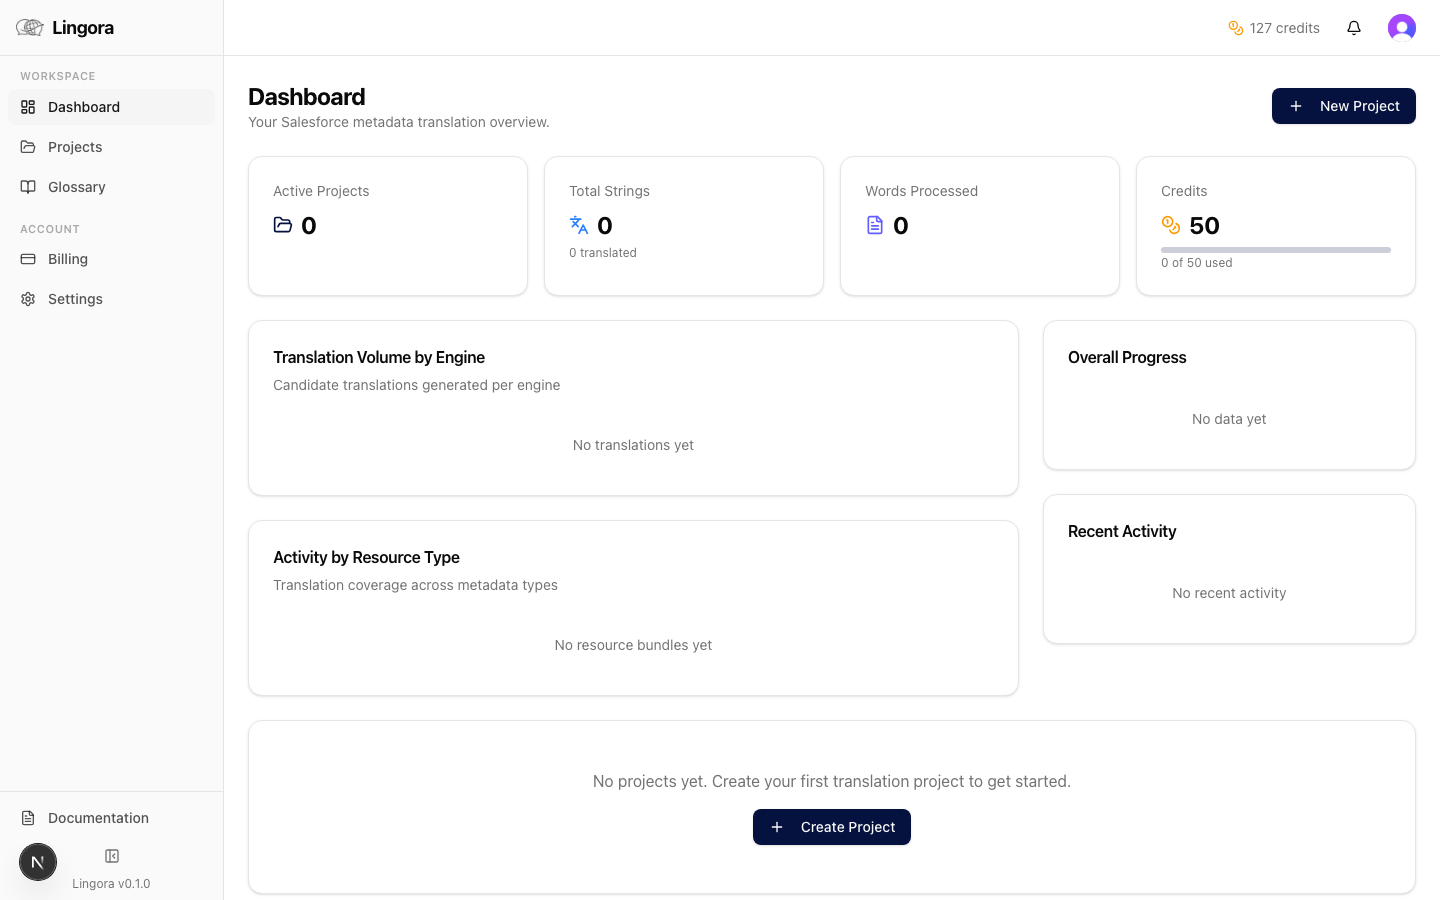
- Dashboard — overview of recent projects, credit usage, and activity
- Projects — all your translation projects; create new ones here
- Glossary — manage your organization's terminology to ensure consistency across all translations
Account
- Billing — manage your subscription, purchase credit bundles, and view invoices
- Partner — multi-org management dashboard (Partner tier only)
- Settings — engine configuration, Salesforce connection, and org preferences
Click the arrow at the bottom of the sidebar to collapse it to icon-only mode when you need more screen real estate.
Header
The persistent top header shows:
- Organization selector — if you belong to multiple organizations, switch between them here
- Credit balance — your current LLM credit balance is always visible. When the balance drops below 10 credits, the indicator turns amber as a heads-up to top up.
- User menu — access your profile, notification settings, and sign-out
4. Your First Translation Project
Upload Flow (All Tiers)
This flow works for every account. You prepare your files in Salesforce, upload them into Lingora, and work from there.
Before you start: In Salesforce Setup, go to Translation Workbench and export the languages you want to translate. You'll receive XLIFF or STF files.
Steps:
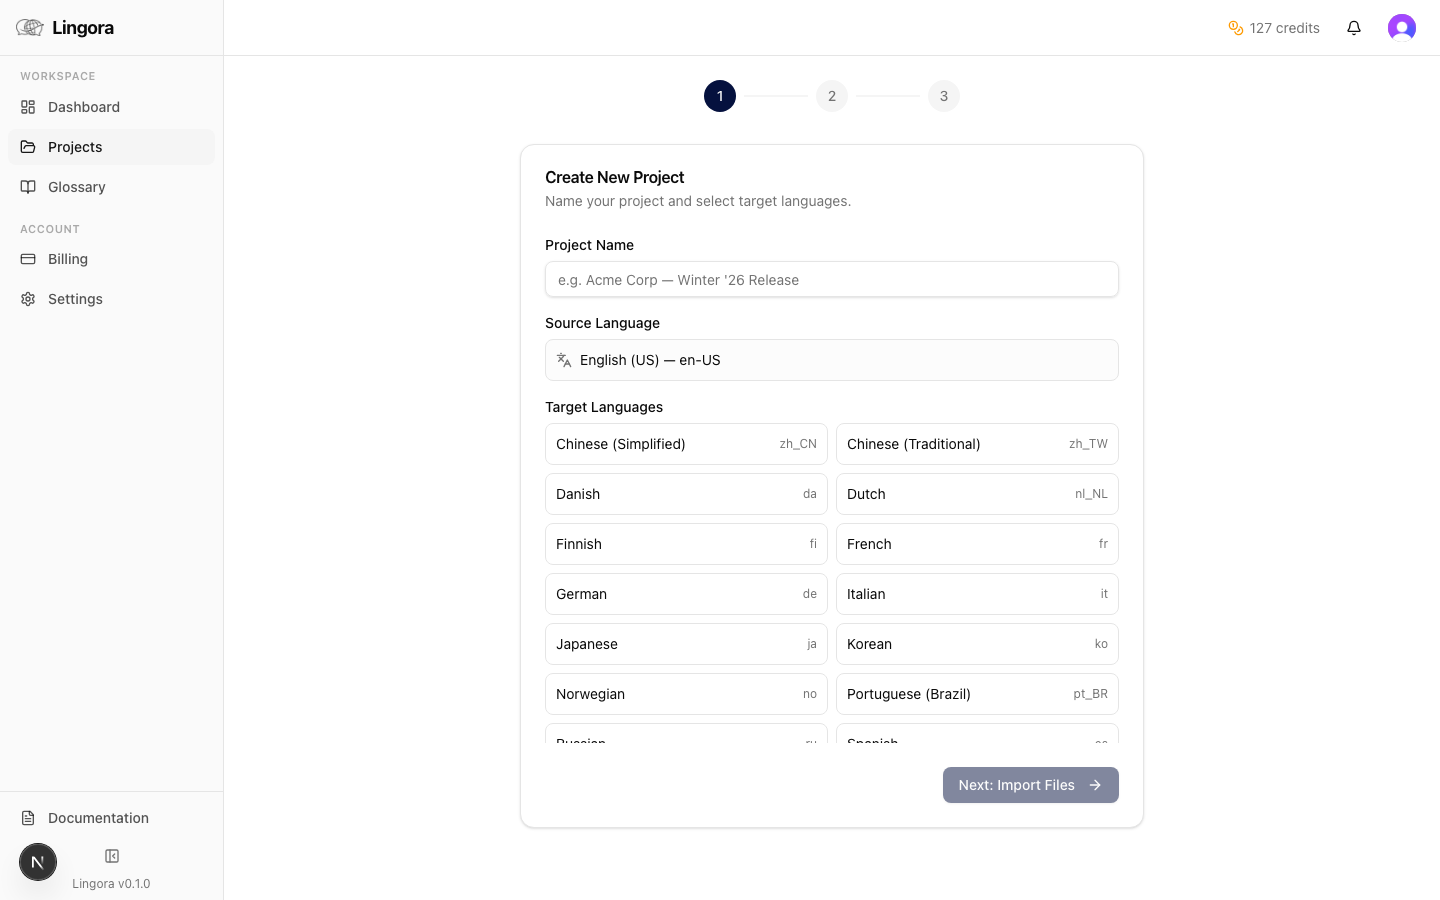
- In the sidebar, click Projects, then click New Project.
- Step 1 — Project details: Enter a project name (e.g., "Spring '26 Release — German"), select your source language (typically
en-US), and choose one or more target languages. - Step 2 — Upload file: Drag and drop your XLIFF or STF file onto the upload area, or click to browse your file system. Lingora supports XLIFF 1.2, XLIFF 2.0, and Salesforce STF format.
- Step 3 — Review and create: Confirm the summary — Lingora shows you the number of translation units detected, grouped by resource type. Click Create Project.
- Your project opens immediately. Strings are organized into bundles by resource type (e.g., CustomLabel, CustomObject, Flow).
Salesforce Connected Flow (Studio and Partner Tiers)
If your account is on Studio or Partner tier and you've connected a Salesforce org, Lingora can retrieve translatable metadata directly — no manual export required.
Before you start: Connect your Salesforce org in Settings > Salesforce Connection (see the Settings & Engine Configuration guide for details).
Steps:
- In the sidebar, click Projects, then click New Project.
- Toggle Connect to Salesforce to enable the connected flow.
- Select your target languages. The list is automatically filtered to languages enabled in your connected org.
- Click Retrieve Metadata — Lingora calls the Salesforce Metadata API to pull all translatable content directly.
- Bundles are created automatically from the retrieved metadata. No file upload needed.
Tip: The connected flow is the fastest way to keep your Salesforce translations in sync. You skip the export/import steps entirely.
5. Translating Your Content
Entering the Workspace
From any project page, click a bundle card to open the Translation Workspace for that bundle. This is where the translation work happens.
Workspace Layout
The workspace uses a three-panel layout:
- Left panel — String list: Every translation unit in the bundle, with a search bar and filter controls at the top. Each string shows a status badge: Pending, Translated, Approved, or Needs Review. Click any string to make it active.
- Center panel — Active string: The source string at the top, followed by one or more translation candidates below. This is where you review, edit, and approve translations.
- Right panel — Context: Metadata details for the active string — resource type, field name, picklist value context, and any glossary matches relevant to this string.
Translation Candidates
Lingora generates candidates based on string complexity:
- Complex strings (complexity score above 0.3) receive 3 candidates from the Lingora LLM engine, giving you different stylistic options:
- Literal — stays close to the source structure
- Idiomatic — natural-sounding in the target language
- Formal — professional register suitable for enterprise UI
- Simpler strings receive a single candidate — one high-confidence translation ready to approve.
Reviewing and Approving
- Click a candidate to select it. The selected candidate is highlighted.
- If you want to edit a candidate, click the edit icon or press
rto open the inline editor. Make your changes and save. - Click Approve (or press
a) to approve the selected candidate and advance to the next string.
Batch Operations
For large bundles, use the batch controls at the top of the string list:
- Translate All Pending — sends all untranslated strings to your configured engine. Results appear as candidates for review.
- Approve All Translated — bulk approves all strings that have a single candidate and haven't been manually edited. Use this to quickly clear high-confidence translations.
- Apply TM Matches — applies Translation Memory matches above your configured threshold. Strings with a TM match are pre-filled and can be approved in a single click. TM matches consume zero credits.
6. Keyboard Shortcuts
The workspace is built for keyboard-first navigation. Learn these shortcuts and you'll move through large bundles quickly.
| Key | Action |
|---|---|
j | Move to next string |
k | Move to previous string |
a | Approve current string |
1 | Select candidate 1 |
2 | Select candidate 2 |
3 | Select candidate 3 |
u | Use the recommended candidate |
r | Open inline editor (Request Changes) |
/ | Focus the search bar |
Escape | Close editor / dismiss modal |
7. Exporting Your Translations
Download as File
When your bundle (or full project) is ready to export:
- From the project page, click Export.
- Review the export summary: total translation units, approved count, and any unapproved strings that will be carried through as-is or skipped depending on your export settings.
- Choose your output format: XLIFF or STF.
- Optionally enable Bundle by Resource Type to receive separate files per metadata type — useful when importing back into Translation Workbench in batches.
- Click Download. Your browser downloads the translated file(s) immediately.
Import the downloaded files into Salesforce Translation Workbench using the standard Upload Translation process.
Deploy Directly to Salesforce (Connected App Mode)
If your project uses the Salesforce connected flow (Studio and Partner tiers):
- From the project page, click Deploy to Salesforce.
- Lingora assembles the translated metadata and pushes it directly to your org via the Metadata API.
- A deployment status indicator shows progress. You'll receive a notification when the deployment completes or if any errors occur.
Tip: Always do a test deploy to a sandbox before pushing to production.
8. Understanding Credits
Credits are the Lingora LLM engine's currency. Here's what you need to know:
When credits are consumed:
- 1 credit per string when the LLM generates a single candidate
- 3 credits per string when the LLM generates 3 candidates (complex strings)
When credits are NOT consumed:
- BYOK engines (DeepL, Google Translate, Lara with your own API key) — always zero credits
- Translation Memory matches — zero credits, regardless of string count
- Failed translations — credits are never deducted if an engine call fails
Checking your balance:
Your credit balance is always visible in the header. When it drops below 10 credits, the indicator turns amber. Purchase a credit bundle any time from Billing without changing your subscription tier.
Tips for managing credits:
- Run "Apply TM Matches" before translating — it fills in repetitions for free
- Use BYOK engines for high-volume, lower-complexity content
- Reserve Lingora LLM for complex strings, UI error messages, and anything where nuance matters
9. Pricing Tiers
| Tier | Price | LLM Credits | Key Features |
|---|---|---|---|
| Free | $0/mo | 50 one-time | Upload-based workflow, all BYOK engines, full workspace |
| Pro | $29/mo | 250/mo | All engines, credit bundle purchases, full project history |
| Studio | $79/mo | 750/mo | Salesforce Connected App, metadata retrieve and deploy |
| Partner | $199/mo | 2,000/mo | Multi-org management, shared credit pool, white-label exports |
All paid tiers include a 14-day free trial. Upgrade, downgrade, or cancel any time from Billing.
Credit bundles can be purchased on Pro tier and above. They never expire and stack with your monthly allowance.
10. Next Steps
You've got the essentials. Here's where to go deeper:
- Dashboard & Projects Guide — project management, filtering, and search across your full project history
- Translation Workspace Guide — advanced workspace features, filters, TM configuration, and glossary integration
- Settings & Engine Configuration — connecting BYOK engines, Salesforce OAuth setup, and org preferences
- Glossary Management — build and maintain a terminology glossary to ensure brand and product names are never mistranslated
- Billing & Credits — subscription management, credit bundle purchases, and invoice history
If you run into anything not covered here, reach out to support from the Help menu in the top header. We're happy to help.