Translation Workspace
The Translation Workspace is where you review, edit, and approve translated strings before exporting them back to Salesforce. This guide walks you through every feature in the workspace so you can translate efficiently and with confidence.
Opening the Workspace
- In the top navigation, click Projects.
- Click the project you want to work on.
- On the project detail page, locate the bundle you want to translate and click its card. A bundle represents a single resource type (for example, Custom Labels) in a specific target language.
The workspace opens, scoped to that resource type and target language combination. All strings, status counts, and batch operations shown in the workspace belong to that bundle only.
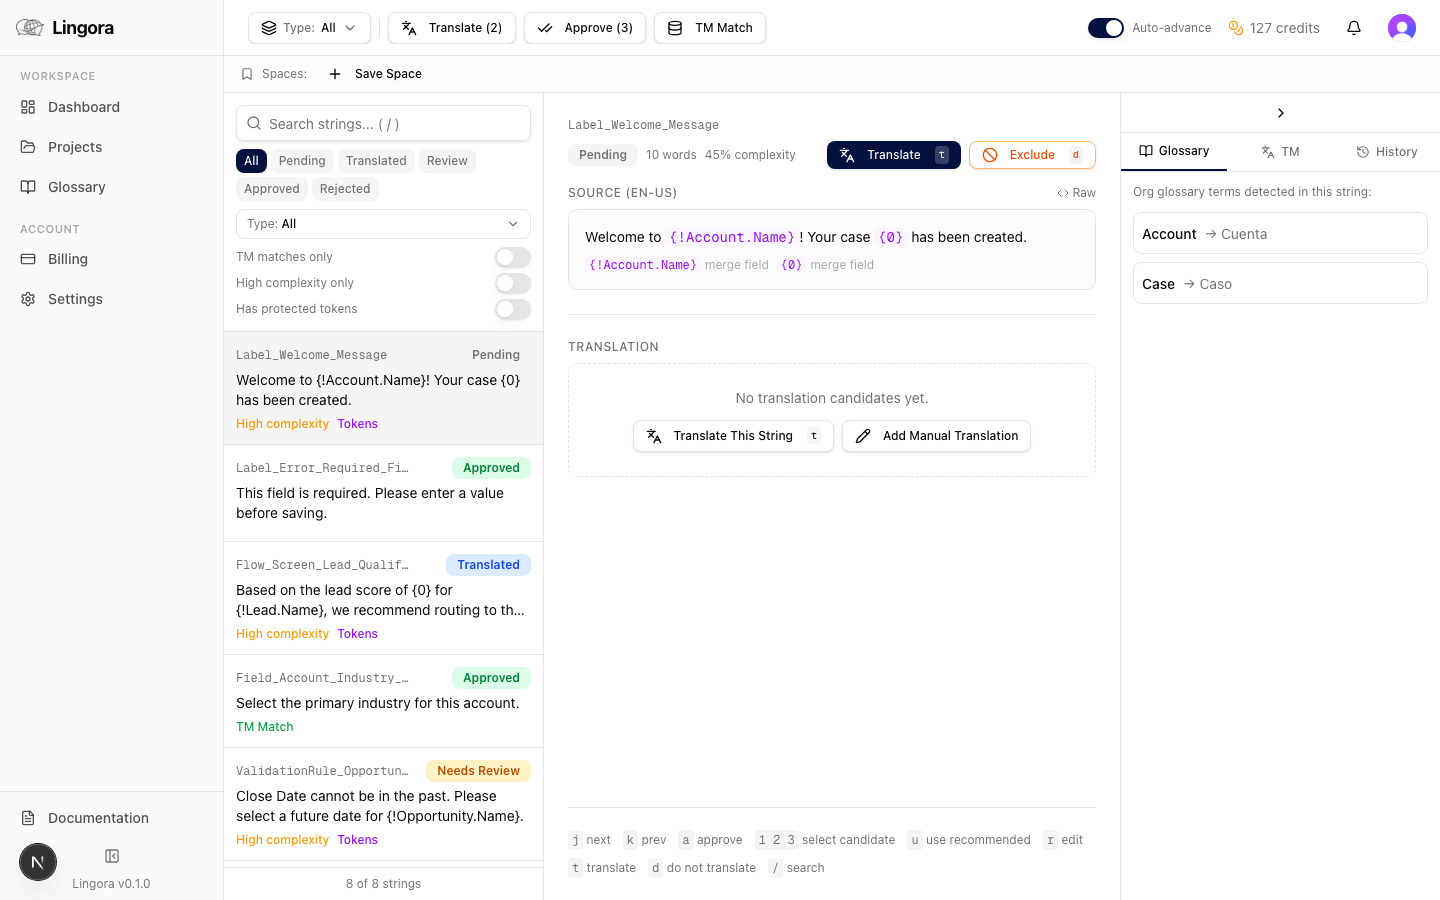
Three-Panel Layout

The workspace is divided into three panels:
| Panel | Position | Purpose |
|---|---|---|
| String List | Left | Browse, search, and select translation units |
| Active String | Center | Review and act on the selected translation unit |
| Context Panel | Right | Collapsible — shows metadata and token details |
Each panel is described in full below.
Left Panel — String List
The left panel lists every translation unit in the bundle. Use it to navigate between strings and narrow your focus to what needs attention.
Searching Strings
Type in the search bar at the top of the panel to filter strings in real time. The search matches against both source text and any existing target text.
Press / anywhere in the workspace to jump focus directly to the search bar.
Filtering by Status
Use the status filter to show only strings in a particular state:
| Status | Color | Meaning |
|---|---|---|
| Pending | Grey | No translation candidate yet |
| Translated | Blue | Candidate ready for review |
| Needs Review | Amber | Flagged for manual attention |
| Approved | Green | Translation confirmed |
| Rejected | Red | Translation rejected — needs re-translation |
Filtering by Resource Type
If the project contains multiple resource types (for example, Custom Labels and Validation Rules), you can narrow the string list to a specific metadata type using the resource type filter.
Protected Token Legend
When any string in the current view contains protected tokens, a legend appears at the top of the string list. It shows which token types are present (merge fields, format tokens, HTML tags) and what the purple chips in the center panel represent. See Protected Tokens for full details.
Multi-Select
To perform a batch action on a specific subset of strings, use multi-select. Check the checkbox next to each string you want to include, then choose an action from the Batch Toolbar. See Batch Operations for available actions.
Selecting a String
Click any string in the list to load it in the center panel. The selected string is highlighted. Use the j and k keyboard shortcuts to move to the next or previous string without using the mouse.
Center Panel — Active String
The center panel shows the currently selected translation unit in full detail.
Source Text
The source text (the original English string from Salesforce) is shown at the top of the panel. Any protected tokens in the source are displayed as purple highlighted chips showing the original token value — for example, a chip labelled {!Contact.FirstName} or {0}. These tokens are automatically preserved through translation and are never sent to a translation engine. See Protected Tokens for more information.
Status Badge
A color-coded badge on the right of the source section shows the current status of this string: Pending, Translated, Needs Review, Approved, or Rejected.
Engine Badge
Below the status badge, an engine badge shows which translation engine produced the current candidates — for example, DeepL, Google, Lara, or Lingora. If the translation was applied from Translation Memory, the badge reads TM Match.
Single-Candidate View
When a string has a straightforward complexity score, the workspace shows a single translation candidate.
- The candidate text is shown in a translation card.
- Protected tokens in the translation appear as the same purple chips as in the source — they are restored verbatim from the source.
- Approve — confirms the translation and advances the string to Approved status.
- Request Changes — flags the string as Needs Review and opens an inline editor pre-populated with the candidate text. Edit the text and save to store your corrected translation.
3-Candidate View

When a string has a complexity score above 0.3 and is processed by the Lingora LLM engine, the workspace produces three distinct candidates instead of one.
The Three Strategies
| Strategy | Description |
|---|---|
| Literal | Stays close to the source phrasing — a word-for-word rendering |
| Idiomatic | Natural, fluent expression in the target language |
| Formal | Professional or formal register — suited to UI copy and official communications |
Candidate Cards
Each strategy is shown as a stacked card with:
- A strategy badge (Literal, Idiomatic, or Formal) in the card header.
- The candidate text, with protected tokens shown as purple chips.
- A confidence indicator showing the engine's confidence in that candidate.
The recommended candidate — chosen by Lingora based on the complexity analysis — is highlighted with a green ring and a Recommended label.
Acting on 3-Candidate Strings
- Use Recommended — approves the recommended candidate in one click. You can also press
u. - Select a card individually — click any card (or press
1,2, or3) to select that candidate. Once selected, click Approve to confirm it. - Request Changes — available on each card, opens the inline editor pre-populated with that card's text.
Important: 3-candidate strings always require a manual selection. They are never auto-approved by batch operations such as Approve All Translated. This ensures that the higher-complexity strings in your bundle always receive a human review.
Right Panel — Context Panel
The context panel is a collapsible side panel on the right side of the workspace.
It opens automatically when a high-complexity string is selected, and can be toggled manually at any time.
The panel provides:
- Source metadata — the Salesforce object, field, and metadata type this string belongs to.
- Translation context — any contextual notes associated with this string or resource type.
- Token legend — a full list of every protected token in the current string, with its type and original value.
Use the context panel when you need to understand what a string actually does in Salesforce before confirming a translation — particularly for Validation Rule messages, Field Help Text, or strings with several format tokens.
Batch Operations
The Batch Toolbar sits above the string list. Use it to operate on many strings at once rather than reviewing them one by one.
| Operation | What it does | Notes |
|---|---|---|
| Translate All Pending | Submits all pending strings to translation engines | Fires a background job — monitor progress in the Job Monitor |
| Approve All Translated | Bulk-approves all single-candidate translated strings | Skips 3-candidate strings, which always require manual review |
| Apply TM Matches | Applies all Translation Memory matches at or above the match threshold | Instant — no credits consumed |
When you have strings selected via multi-select, batch operations apply only to the selected strings. When nothing is selected, they apply to all eligible strings in the current filtered view.
Job Monitor
When you trigger Translate All Pending or any other background job, the Job Monitor panel appears at the bottom of the workspace.
- Active jobs are shown with a loading indicator and a progress count (for example, "42 / 150 strings").
- Completed jobs show a green checkmark.
- Failed jobs show a red X. Click the job row to see the error detail.
The Job Monitor refreshes automatically every two seconds. When a job finishes, a toast notification appears in the bottom-right corner of the screen.
You do not need to keep the workspace open while a job runs. Progress is persisted — if you navigate away and return, the Job Monitor will show the current state of any running or completed jobs.
Keyboard Shortcuts
Keyboard shortcuts let you review and approve strings rapidly without reaching for the mouse. Shortcuts are active whenever focus is not inside a text input or textarea.
| Key | Action |
|---|---|
j | Move to the next string in the list |
k | Move to the previous string in the list |
a | Approve the current string |
1 | Select candidate 1 (3-candidate view) |
2 | Select candidate 2 (3-candidate view) |
3 | Select candidate 3 (3-candidate view) |
u | Use the Recommended candidate (3-candidate view) |
r | Request Changes — opens the inline editor |
/ | Focus the search bar |
Escape | Close the inline editor |
A fast review workflow for a bundle of single-candidate strings: press j to advance, a to approve, repeat. For 3-candidate strings, press u to accept the recommendation or 1/2/3 to pick a different strategy, then a.
Protected Tokens
Lingora automatically detects and protects content that must not be translated. Before any string is sent to a translation engine, protected tokens are replaced with numbered placeholders ({{0}}, {{1}}, and so on). After translation, the original values are restored exactly.
What Gets Protected
| Token Type | Examples |
|---|---|
| Merge fields | {!Contact.FirstName}, {!Account.Name} |
| Format tokens | {0}, {1} (used in custom labels with runtime parameters) |
| HTML tags | <b>, <a href="...">, <br/> |
| Internal Salesforce URLs | lightning/ and apex/ paths |
How They Appear in the Workspace
In both the source text and translation candidates, protected tokens are rendered as purple highlighted chips showing the original token value. The chips are non-editable — you cannot accidentally delete or modify them in the inline editor.
If you open the inline editor to correct a translation, the chips behave as atomic blocks. Move your cursor around them as you would around a word.
Glossary Term Protection
Terms in your org's Glossary are also protected from engine modification. Glossary terms are highlighted differently from Salesforce tokens. See the Glossary Management guide for details on building and maintaining your glossary.
Translation Memory
Every string you approve is automatically stored in your org's Translation Memory (TM).
The next time a matching or near-matching string appears — whether in a new upload, a different project, or a reprocessed file — Lingora checks TM first. If a match is found at or above the configured threshold, it is applied instantly without calling any translation engine.
Key Facts
- Zero credits consumed — TM matches are free.
- Org-scoped — your translations are never shared with other organisations.
- Global pool — translations for strings that contain no protected tokens may contribute to a global TM pool, benefiting all Lingora customers.
- Apply TM Matches — use the batch operation to apply all pending TM matches in one step before running engine translation. This reduces the number of strings sent to engines and saves credits.
Status Workflow
Each translation unit moves through a defined status lifecycle:
Pending → Translated → Approved
                    ↘ Needs Review → Approved
                    ↘ Rejected     → (re-translate or edit → Translated)
- Pending — the string has not yet been translated.
- Translated — a candidate exists and is awaiting review.
- Needs Review — you have flagged the string using Request Changes but have not yet saved a corrected translation.
- Approved — the translation is confirmed. Approved strings are included in the export.
- Rejected — the translation has been dismissed. A rejected string can be re-queued for translation or manually edited.
Only Approved strings are included when you export the bundle back to Salesforce.
Tips
- Start with Apply TM Matches. Before running engine translation, apply any TM matches to reduce engine usage and credit spend.
- Use Approve All Translated for bulk review. If you trust single-candidate output from a reliable engine, approve all translated strings in one click, then turn your attention to 3-candidate strings that need manual selection.
- Build your glossary first. Glossary terms are protected before any engine call. A well-maintained glossary keeps product-specific terminology consistent across all translations.
- Use the keyboard for fast review.
j/kto navigate,ato approve,uto use the recommended 3-candidate translation. A full bundle review takes minutes instead of hours. - Check the Context Panel for ambiguous strings. Knowing that a string is a Validation Rule error message versus a field label changes how it should be translated.
- Monitor background jobs. After triggering Translate All Pending, you can continue reviewing already-translated strings while the engine processes the rest. The Job Monitor updates in real time.
Related Guides
- Getting Started — first-time account and project setup
- Dashboard & Projects — creating and managing projects
- Glossary Management — building your org glossary
- Export & Deployment — exporting approved translations back to Salesforce